
982 字
5 分钟
Electron初尝试
最近学习了下前端(js还没怎么学)
在了解js的途中了解到了Electron
早闻其大名于是就来尝试一下
Electron的安装与配置
node.js
这是node.js的官网,需要下载node.js才可以使用
检查安装
node -vnpm -vgit
https://git-scm.com/downloads/win
需要下载这两者
检查安装
git --version换源
由于一些原因,npm,pip以及各类Linux的包管在国内的速度可以说几乎为0
那么就需要国内的镜像站进行下载
npm 官方原始镜像网址是:https://registry.npmjs.org/ 淘宝镜像:http://registry.npmmirror.com
npm config set registry https://registry.npmmirror.com进行换源
创建工作目录以及初始化
然后随便找个地方新建一个文件夹,并且在此目录打开git bash进行初始化
mkdir test #test是文件夹名称cd testnpm init #进行初始化,有让你填写的东西可以直接回车跳过然后下载electron
npm install -g electron#或者说如果无法下载可以线通过淘宝源下载cnpmnpm install -g cnpm --registry=https://registry.npmmirror.comcnpm install -g electrontest文件夹会生成一个package.json 文件
{ "name": "test", # 你项目的名称(必填!) "version": "1.0.0", # 版本(必填!) "description": "", # 描述(必填!) "license": "ISC", # 协议 "author": "", #作者(必填!) "type": "commonjs", "main": "index.js", # 程序入口 "scripts": { "test": "echo \"Error: no test specified\" && exit 1" }}在此目录下创建一个文件inex.js
// 导入模块const { app, BrowserWindow } = require('electron')
app.on('ready', () => { //当app准备好后,执行createWindow创建窗口 const win = new BrowserWindow({ width: 800, //窗口宽度 height: 600, //窗口高度 autoHideMenuBar: true, //自动隐藏菜单档 alwaysOnTop: true, //置顶 x: 100, //窗口位置x坐标 y: 100 //窗口位置y坐标 }) //加载一个页面 win.loadFile('') //此处写你存html的路径然后git bash里输入
npm start你就会发现
$ npm startnpm error Missing script: "start"npm errornpm error Did you mean one of these?npm error npm star # Mark your favorite packagesnpm error npm stars # View packages marked as favoritesnpm errornpm error To see a list of scripts, run:npm error npm runnpm error A complete log of this run can be found in: C:\Users\1\AppData\Local\npm-cache\_logs\2025-02-04T15_17_29_225Z-debug-0.log报错,显示为缺失start
让我们回到刚刚的package.js文件,找到
"scripts": { "test": "echo \"Error: no test specified\" && exit 1"}并且添加一个start,修改如下
"scripts": { "start": "electron .", "test": "echo \"Error: no test specified\" && exit 1" }这样就能成功运行了
打包
{% tabs 分类 1 %}
electron-builder是electron社区开发的打包工具,用起来相对简便
electron官方的打包工具(本文不提及使用方法)
{% endtabs %}
electron-builder安装起来很简单(前提是你得有一个良好的网络环境)
npm install --save-dev electron-builder# 或者cnpm install --save-dev electron-builder继续去package.js里面
添加一个build
"build": { "productName":"xxxx",//项目名 这也是生成的exe文件的前缀名 "appId": "com.leon.xxxxx",//包名 "copyright":"xxxx",//版权 信息 "directories": { // 输出文件夹 "output": "build" }, "nsis": { "oneClick": false, // 是否一键安装 "allowElevation": true, // 允许请求提升。 如果为false,则用户必须使用提升的权限重新启动安装程序。 "allowToChangeInstallationDirectory": true, // 允许修改安装目录 "installerIcon": "./build/icons/aaa.ico",// 安装图标 "uninstallerIcon": "./build/icons/bbb.ico",//卸载图标 "installerHeaderIcon": "./build/icons/aaa.ico", // 安装时头部图标 "createDesktopShortcut": true, // 创建桌面图标 "createStartMenuShortcut": true,// 创建开始菜单图标 "shortcutName": "xxxx", // 图标名称 "include": "build/script/installer.nsh", // 包含的自定义nsis脚本 }, "publish": [ { "provider": "generic", // 服务器提供商 也可以是GitHub等等 "url": "http://xxxxx/" // 服务器地址 } ], "files": [ "dist/electron/**/*" ], "dmg": { "contents": [ { "x": 410, "y": 150, "type": "link", "path": "/Applications" }, { "x": 130, "y": 150, "type": "file" } ] }, "mac": { "icon": "build/icons/icon.icns" }, "win": { "icon": "build/icons/aims.ico", "target": [ { "target": "nsis", "arch": [ "ia32" ] } ] }, "linux": { "icon": "build/icons" } }当然,还要在script里添加进行build的命令
"scripts": { "start": "electron .", "test": "echo \"Error: no test specified\" && exit 1", "build": "electron-builder" }然后运行
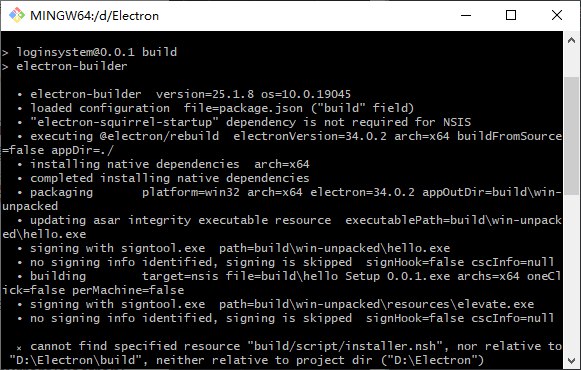
npm run build即可打包
Electron初尝试
https://amciors.cc/posts/electron初尝试/